How to keep your secrets from your source code in an Angular project ?! 🤫
Useful for Vercel, Github Action, Netlify or AWS Amplify.

Let's face it, we all have secrets, but that's not what I want to talk about.
This article shows you a technique to easily use Angular's environment.ts file to access sensitive data without revealing your secrets.
What is a secret?
Secret refers to any sensitive values that are not supposed to be pushed as part of the source code. This can be things like API keys, OAuth tokens, certificates and passwords.
These secrets are often required to integrate with other providers or services as part of the build or deployments.
Secrets can be different based on deployment environments as well.
For example, you might use a test account for development with a different API key to your production.
Why should you care about secrets?
Many projects utilise cloud-based Git and CI/CD tools to manage the source code, build and deploy. So keeping secrets from leaking into your source code is essential.
You typically deal with two types of secrets in client-side projects.
1. Secrets that your client-side app needs to use when talking to a provider.
These secrets are still visible in the JS bundle or API calls. These are secrets like your Google API key that needs to be sent in an HTTP request to Google, for example.
For these types of secret usually, you need accompanying security measures. For example, Google lets you limit an API key to a domain or limit it to specific Google services.
Even for this type, it is a good practice not to hardcode in the source. hardcoding them makes the secret management based on the environment difficult.
Let's say you have a Test and Production environment which use different Google API keys.
If secret is part of the source code you need to remember to change the code each time you want to change it from Test API key to Production one.
In the same way, updating your secret to rotate it can be more challenging.
Now let's add the fact that source code will spread across branches and devices.
I guess you get the picture. This is important and for that reason there are best practices and tools to help you.
For example, Google has "Best practices for securely using API keys." Which suggest not to store API keys in source code.
Or Github will send you a warning email if you push your Google API key. They have this Automatic secret scanning going on.
2. Secrets that are just required as part of the build but not after that.
For example, if my build process can query my content repository(headless CMS) to pre-render some pages to generate static pages.
In that case, I do not need the content repository's API key after the build is done. I will only take the results (static pages) to deploy them. So I can genuinely secure my key by not putting in the source code.
If you are not convinced, read Why secrets in git are such a problem - Secrets in source code.
Utilise Angular environment.ts file to access secrets
The Angular official way to manage the environment configurations is to use the provided environment.ts file.
You can create a file for each environment.
└──myProject/src/environments/
                   └──environment.ts
                   └──environment.prod.ts
                   └──environment.stage.ts
and provide the configs of each environment like this
export const environment = {
  production: true,
  apiUrl: 'http://my-prod-url'
};
You can easily access this configuration in your code.
  import { environment } from '../environments/environment';

  public getBooks() {
    const url = `${environment.apiUrl}/books`;
    return this.http.get<Book>(url);
  }
To get environment specific configs, you can use the env name in the build.
ng build --configuration=stage or use angular.json to define the same thing based on the environment.
"serve": {
  "builder": "@angular-devkit/build-angular:dev-server",
  "options": {
    "browserTarget": "your-project-name:build"
  },
  "configurations": {
    "production": {
      "browserTarget": "your-project-name:build:production"
    },
    "staging": {
      "browserTarget": "your-project-name:build:staging"
    }
  }
},
These configs are pushed to your source code to support the build. So anyone who has access to source code can see these configs in plain text.
This technique is completely fine for typical configs like the apiUrl but not good enough for secrets.
Solution
We can provide secrets through the environemnt.ts files without pushing it to source code using the Environment variable.
An environment variable is a dynamic-named value that can affect how running processes will behave on a computer. They are part of the environment in which a process runs. For example, a running process can query the value of the TEMP environment variable to discover a suitable location to store temporary files, or the HOME or USERPROFILE variable to find the directory structure owned by the user running the process.
These Environment variables are set up on the build machine which your Angular build runs.
There are different ways to set up Environment variables, which can differ based on the context.
We don't want to set up these variables manually, so we use a .env file. You can easily set multiple environment variables and values in one go.
Later you can use the .env file to read these variables based on the environment. The content of .env looks like this.
GOOGLE_API_KEY=34232423423423234233fsajgsaagdda
AUTH0_CLIENT_ID=54235nfgde24gbdf235432
PASSWORD=adjkvknh29827;nbv_
So the idea is that you load the .env file related to an environment (Test, Production) and somehow provide them to the Angular environment.ts file.
How is this approach more secure?
This approach is more secure because simply the .env file, which contains the sensitive values, only exists on your build machine (private server).
So only the person who has access to the build server can read the file. Sensitive values are no longer part of the source code.
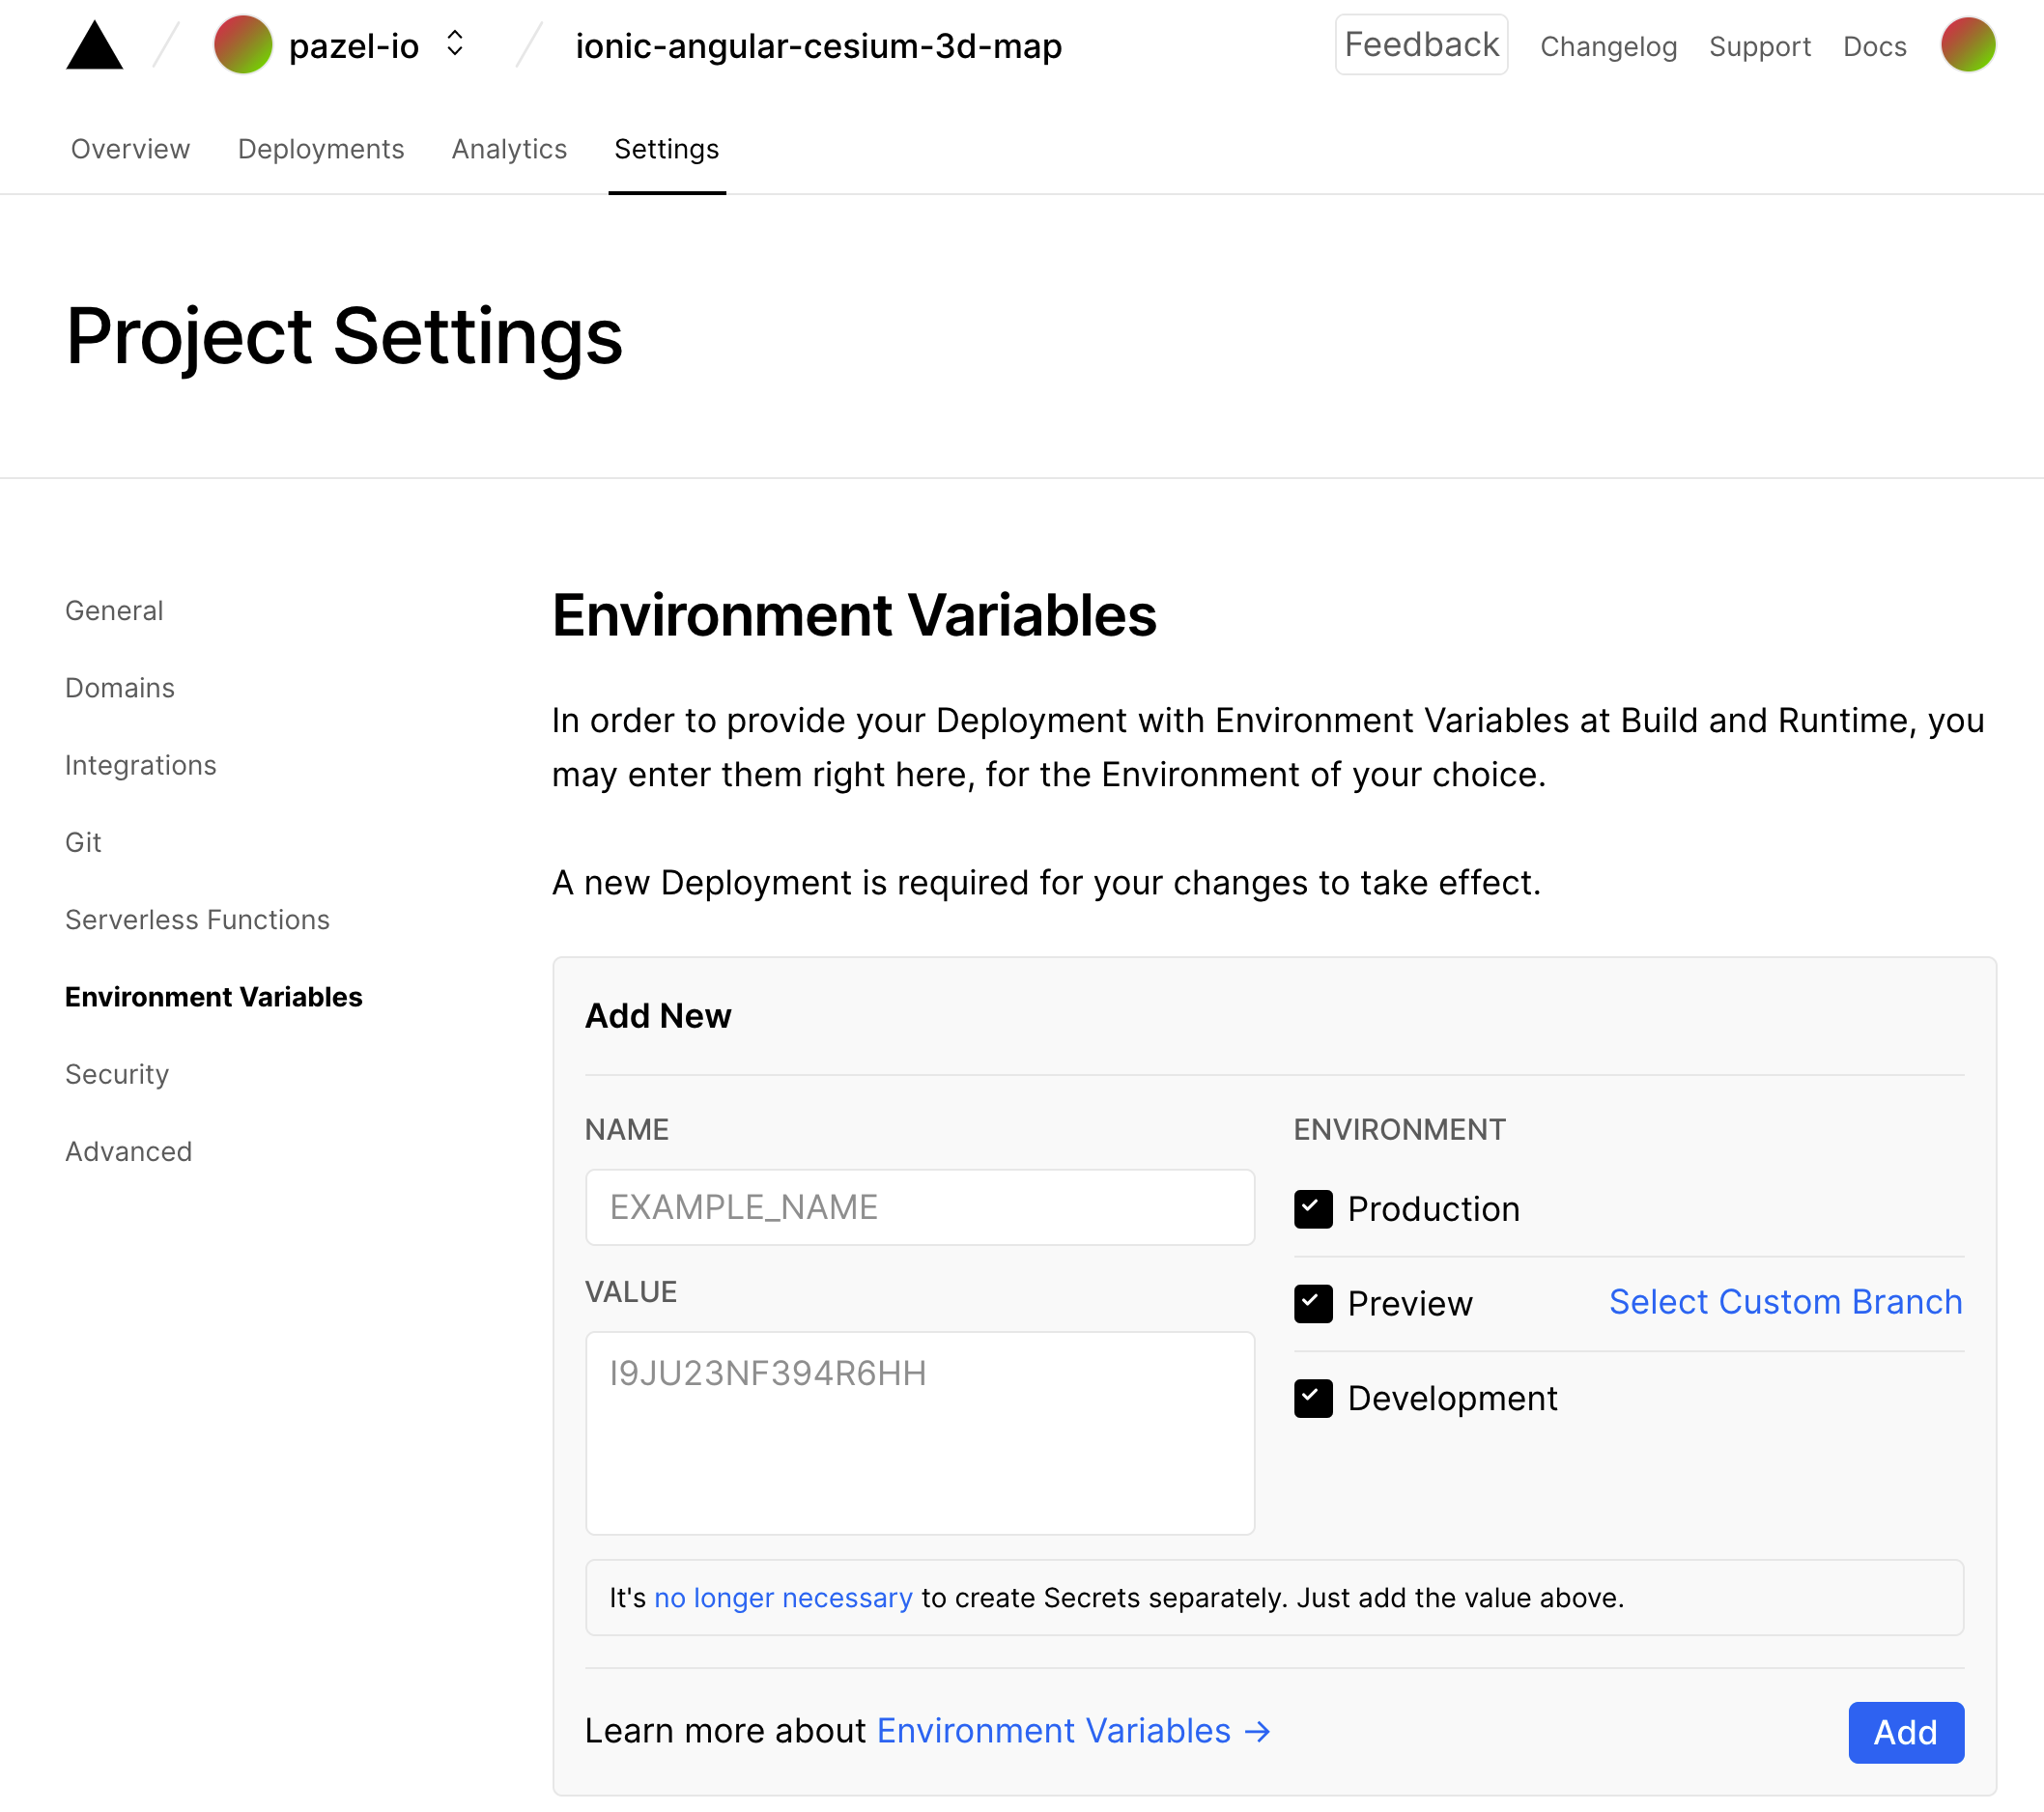
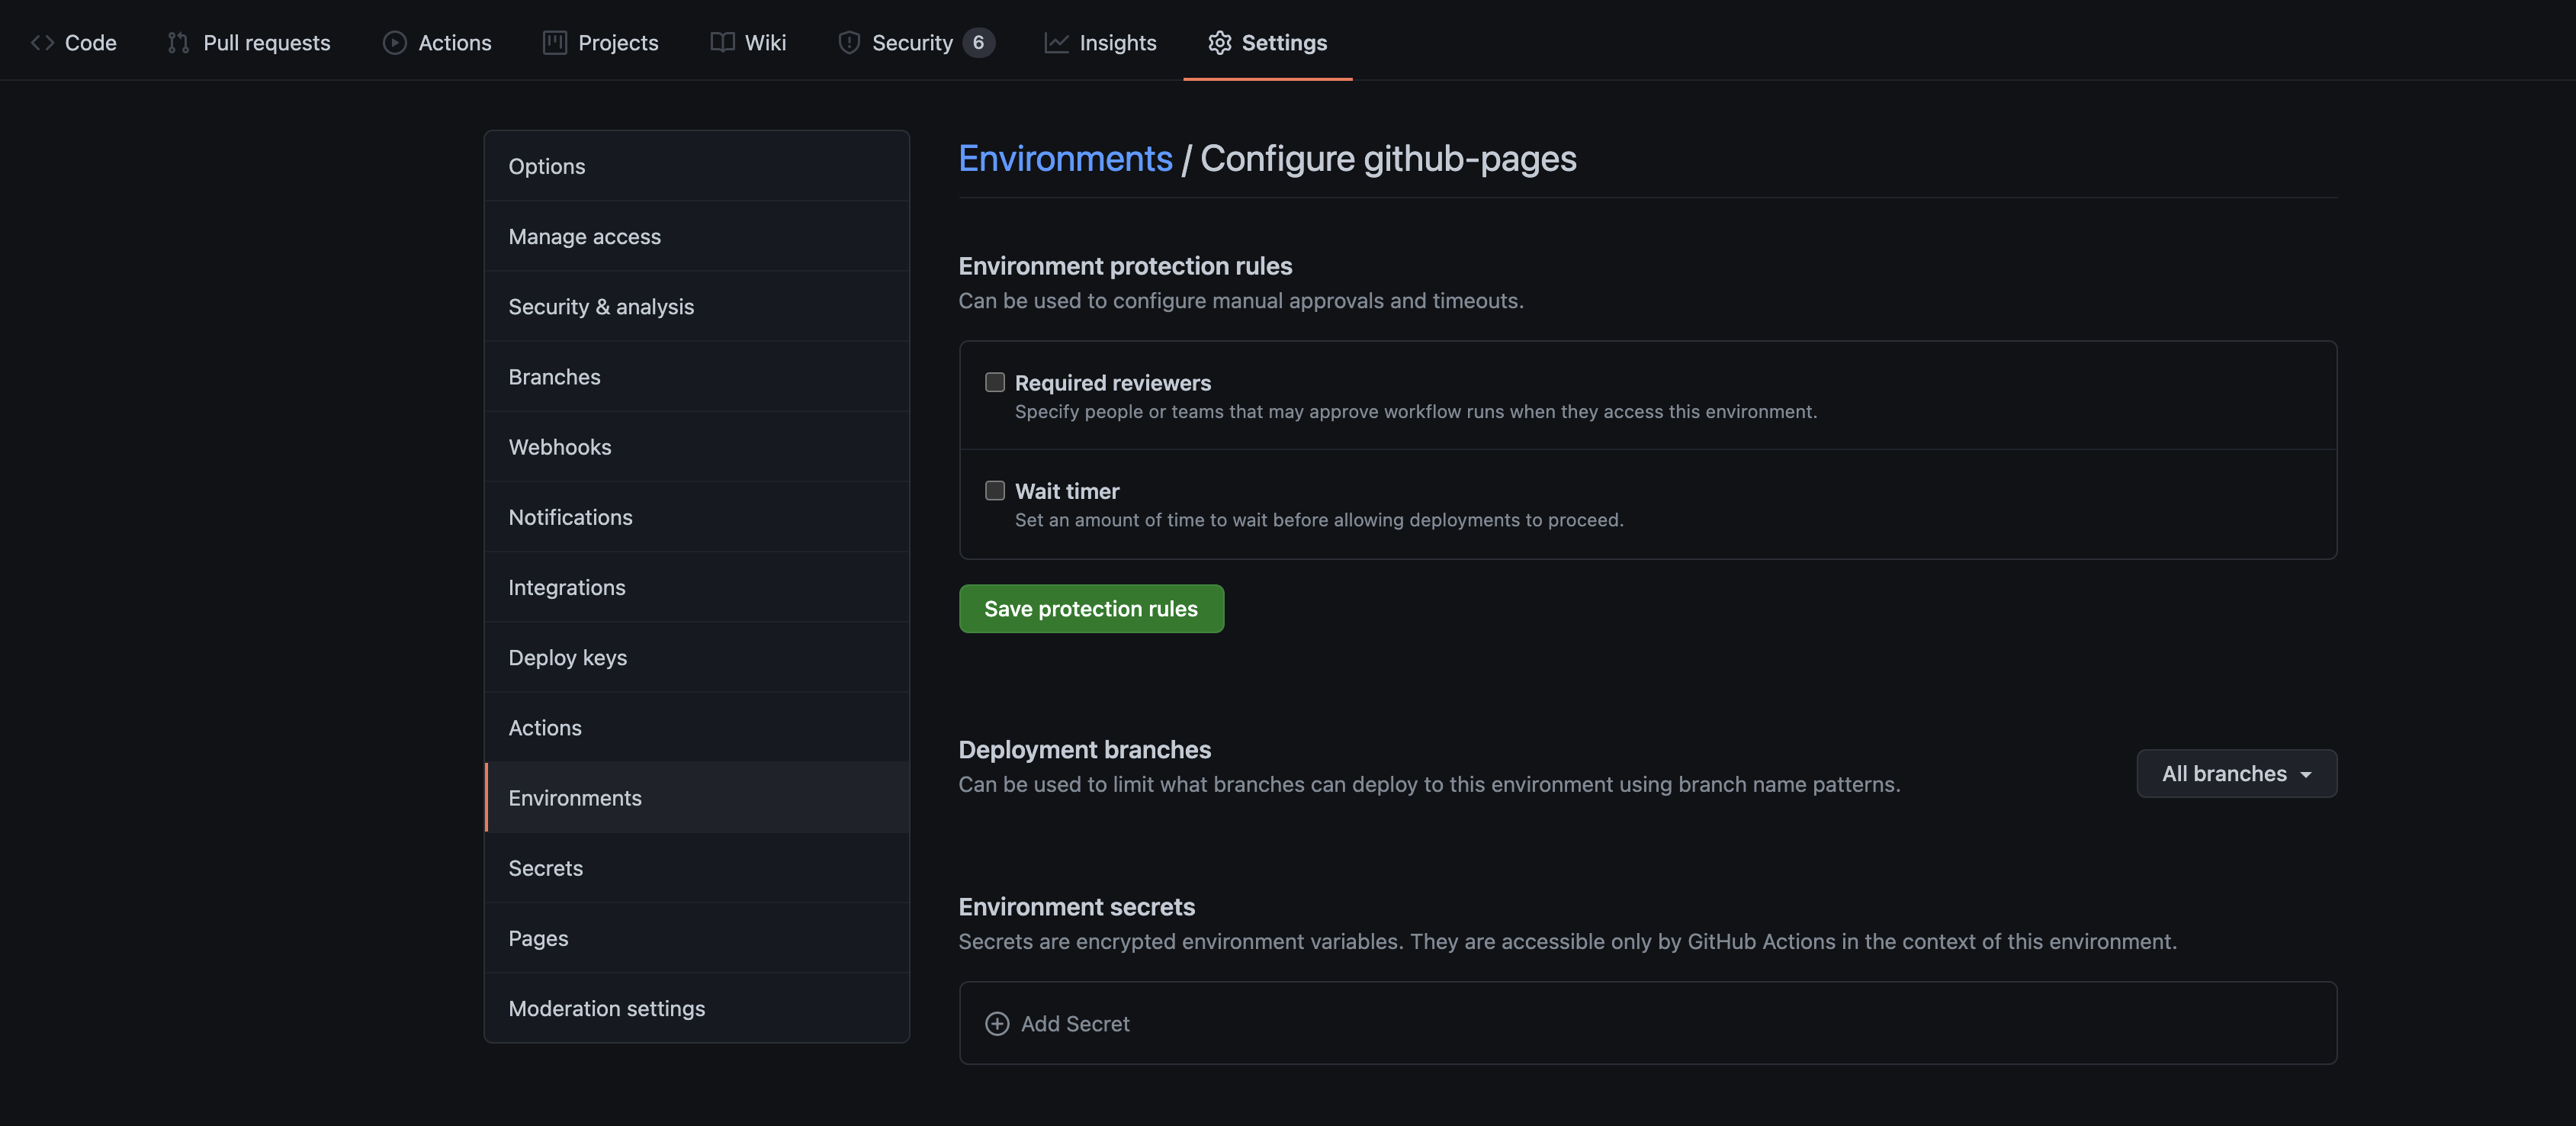
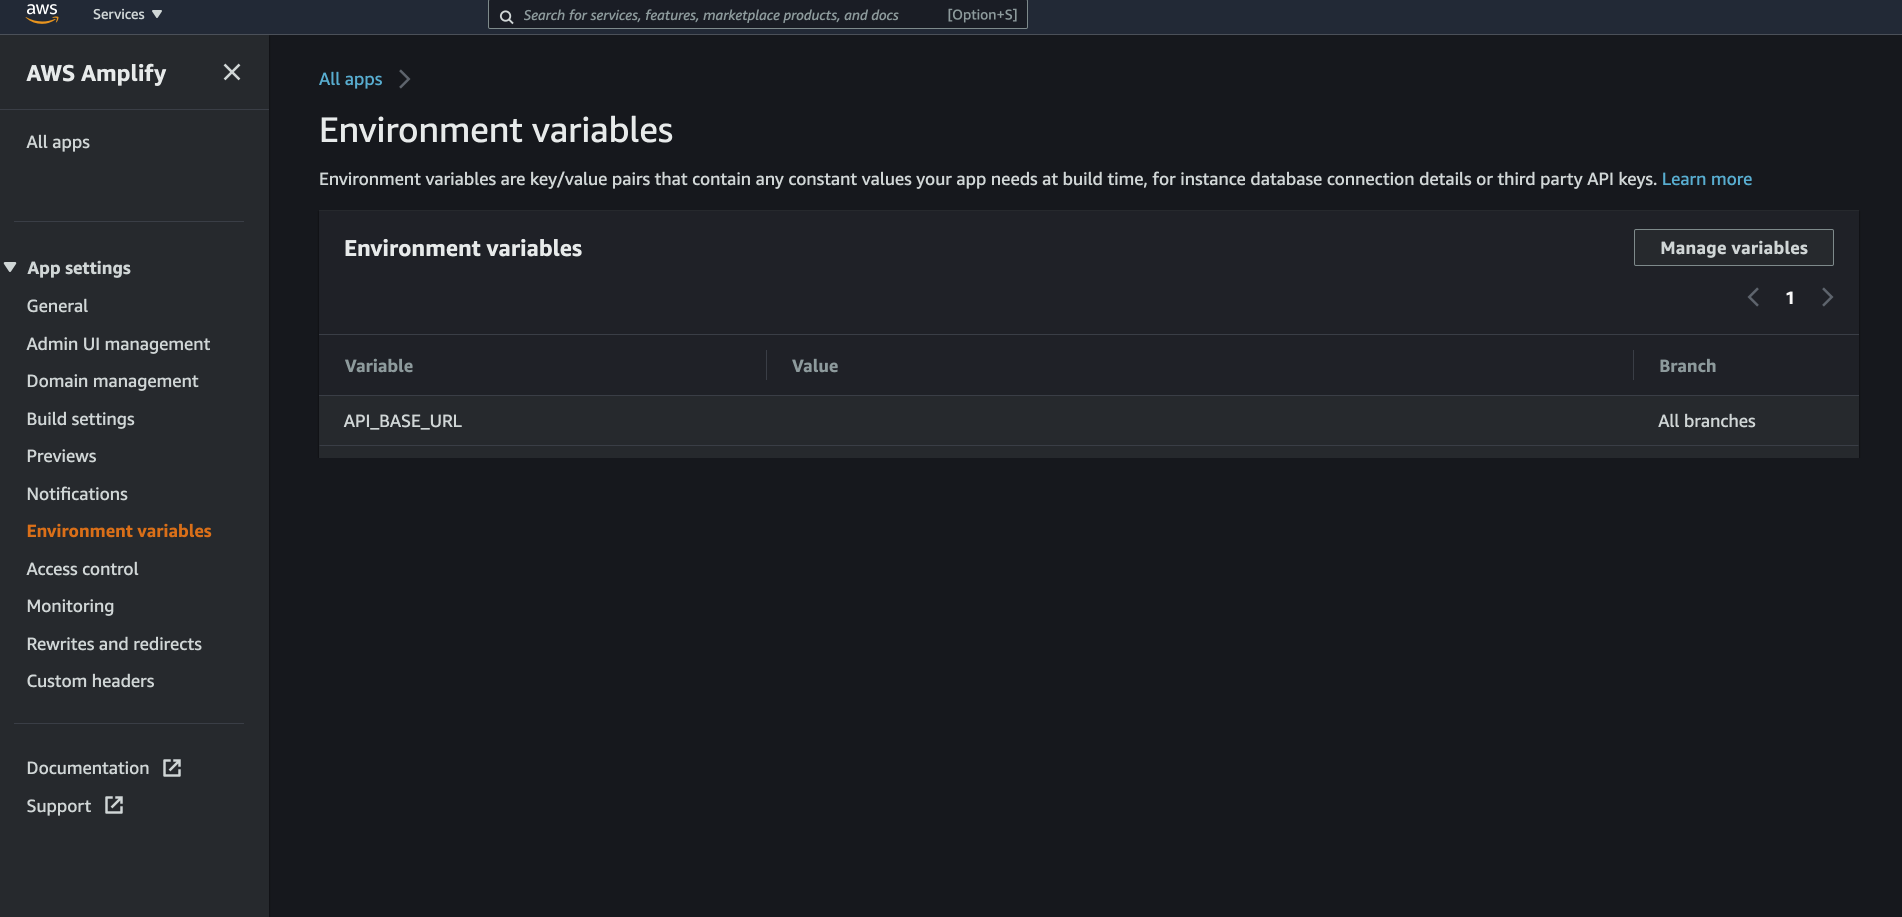
What about the cloud-based CI/CD?
All the cloud-based CI/CDs already provide a way to define and manage Environment variables.
Once you set them up, the Environment variables will be available at runtime when the build is running, and we can access them the same way as if it's our server. Plus, the Environment variables will be secure since they are only available through the cloud-based CI/CD admin dashboard.
Here are some examples from some of the popular cloud-based CI/CDs.
How to access the Environment variable in Angular environment.ts files?
Angular build already utilises Node.js at runtime to do the build, and we can add an npm script to generate the environement.ts as part of the build.
This script will read the environment variables and generate the environement.ts file.
This script is simply JavaScript, so write any logic you need to generate the output.
Here is the code for the script.
const setEnv = () => {
  const fs = require('fs');
  const writeFile = fs.writeFile;
// Configure Angular `environment.ts` file path
  const targetPath = './src/environments/environment.ts';
// Load node modules
  const colors = require('colors');
  const appVersion = require('../../package.json').version;
  require('dotenv').config({
    path: 'src/environments/.env'
  });
// `environment.ts` file structure
  const envConfigFile = `export const environment = {
  googleApiKey: '${process.env.GOOGLE_API_KEY}',
  auth0ClientId: '${process.env.AUTH0_CLIENT_ID}',
  appVersion: '${appVersion}',
  production: true,
};
`;
  console.log(colors.magenta('The file `environment.ts` will be written with the following content: \n'));
  writeFile(targetPath, envConfigFile, (err) => {
    if (err) {
      console.error(err);
      throw err;
    } else {
      console.log(colors.magenta(`Angular environment.ts file generated correctly at ${targetPath} \n`));
    }
  });
};

setEnv();
Let's see what is happening here.
process.envprovides access to the Environment variable in Node.js. So any variable that exists on the build machine will be available through it.fs.writeFilelet us create a file and write content to it. In this case, to generate the environment.ts file.- As a bonus, I am reading the
package.jsonso I can get its version. This way, we can have a version number to display in our UI. This technique is convenient when for providing versioning as part of a release cycle. targetPathis pointing to where the target file should exist.envConfigFileconstant is a template literal that provides the template and content of theenvironment.tsfile. You can specify the variables you want to have in yourenvironment.tshere.console.logare there to make it easy to see the output of the file generation for debugging. Make sure not to log sensitive data here. Logs usually stay around long after the build is complete.dotenvpackage can load a.envfile so you can access the variable you have defined in that file. This trick helps manage a private build server or even building on your local development machine. The script won't fail ifdotenvdoes not find the file in the specified location. So you can leave it there to support both local machine builds and cloud-based CI/CDs.
Automate it
To glue things together, we need to do two more things.
- Firstly, we need to add an npm script that can run our newly added code.
Here the new
confignpm script will run our code. We also update the npm script forbuildto run theconfigbefore build.{ "name": "ionic-angular-cesium-3d-map", "version": "0.0.1", "author": "Ionic Framework", "homepage": "https://ionicframework.com/", "scripts": { "ng": "ng", "start": "ng serve", "build": "npm run config && ng build", "config": "ts-node src/environments/set-env.ts", "test": "ng test", "lint": "ng lint", "e2e": "ng e2e" } } - Last but not least, we need to ignore the generated
environment.tsfile and the.envfile from the source code. Update your.gitignoreto include these files.src/environments/environment.ts src/environments/.env
After following these steps, when you run the build or config npm scripts, it will generate an environment.ts and place it in the environment folder.
File content will be like this.
export const environment = {
    googleApiKey: 'YOUR_ACTUAL_GOOGLE_API_KEY_FROM_ENV_VARIABLES',
    auth0ClientId: 'YOUR_ACTUAL_AUTH0_CLIENT_ID_FROM_ENV_VARIABLES',
    appVersion: '1.0.0',
    production: true,
};
That's it. Now you access these environment configs in your Angular project.
Conclusion
We learned how we can integrate the operating level Environment variables with Angular environment.ts to get the best of both worlds and secure our secrets.
There are more ways to make keeping and sharing secrets more convenient for secrets that might need to be shared on different build machines. What we read in this article is just the first step.
Thanks for reading. As usual, if you have any questions, please leave me a comment here or DM me on Twitter.
Resources
if you need an example project that utilises this solution please refer to my ionic & Cesium 3D map example.
This project uses the same technique to hide the cesiumAccessToken which is used in the code from the source code.
This project builds on Vercel and uses the Vercel Environment variable to provide the cesiumAccessToken.
Here is the code repository: ionic-angular-cesium-3d-map
Contact
Twitter: _pazel